Blister free to Santiago de Compostela
How do you keep blisters away on the Camino de Santiago?
If you are not interested in the chit-chat, please go to the shoe lacing tips straight away:-)
I walked from Saint Jean Pierre de Port to Santiago de Compostela in May/June 2018, again in September 2019 and Porto-Spanish border-Porto in 2020 . To my surprise I saw most people struggling with blisters and other injuries. A lot of people had to give up. So unless you like to chastise yourself, you could prepare yourself and hopefully walk the Camino blister free. One other advantage of being blister free is that you will have no trouble to explore and enjoy the places you will visit. It is not nice if you arrive in for example the lovely town of Pamplona and you cannot roam around because of your sore feet.
I understand everybody is different and things work different for different people. Nevertheless I would like to share my preparation with you so you might benefit from it.
Travel light!
Carrying less weight puts less pressure on your feet thereby reducing the likelihood of blisters. It also reduces pressure on the knees and ankles which can lead to tendonitis, I seriously saw a girl carrying a big bottle of Shampoo (half a liter) and an equally big bottle of conditioner.
Try to carry not more than 10% of your body weight. The trouble is, the lighter you want your gear to be, the more expensive it will be. But you can be creativeJ. I might write something about packing later but I will give you a few examples now:
- Towel: Bring an Indonesian sarong! It weighs almost nothing, it dries in no time and you can also use it as a scarf if it is super cold and windy! You can also opt of a light weight microfiber travel towel but personally, I don’t like them that much. I feel half wet after I dried myself. Stay away from the traditional towels. They are heavy and do not dry quickly (and a humid towel in your bag is not only heavier but can also make your bag pack smell less favorable).
A sarong in Indonesia can be as cheap as 1 or 2 euro. You should be able to buy one in Europe for 10-20 Euro . - I saw some people who brought an extra small towel for their feet. It is quite a good idea not to use your main towel for your feet. What I have learned is that the best way to try between your toes to prevent fungi: a bit of toilet paper! Every Albergue has toilet paper so you do not even need to carry any (and bring anti fungus cream, apply it between your toes after shower, even if you do not have any fungus).
- Apart from the long 17km stretch of nothing on the Meseta, you will be able to find water (even fountains) and food in every little village so do not carry too much. Carrying just half a liter of water should be sufficient in this time of year. I chose to bring a Dopper bottle (dopper.com) with a sportscap and a “Dopper Carrier” which I hooked to my bagpack for easy access while walking (see picture 1).
- Adding to weight: I always bring an ultralight sleeping bag and air mattress, not for sleeping outside but sometimes the snoring is so bad that even earplugs do not help. Just find a spot in a hallway or in the kitchen and sleep there.
Shoes:
Get some good shoes! If you try to be cheap, you will pay the price later. Make sure the shoes you buy are an excellent fit, slip resistant and that they are waterproof.
I choose the Meindl Hiking suede/mesh, gore tex, air Active footbed, Meindl Duo 2921 31 Anthracite category A/B. Since the track can be quite uneven (rocks and mud) I chose ankle high walking boots to prevent ankle injuries while walking on uneven surfaces. It also helps to keep the rain out of your shoes.
After the Meindl wore out, I selected the kinda ugly and cheap looking Salomon-X Ultra. Much cheaper and quite light. I actually liked this shoe more, also because of the support in the middle of the foot.
Please be aware that if it rains, you should always wear water repellent pants to prevent rain getting into your shoes (wet feet=blisters guaranteed).
Preparation:
The first day of the Camino is around 24 km from Saint Jean Pierre de Port to Roncesvalles which might take you are long as 9 hours to complete. Almost all of it is up and the walking conditions are quite tough at times. Apart from Orisson (around 8 km hike from Saint-Jean-Pierre-de-Port), there is pretty much nowhere to stop so once you start, you have no other option than to go on. When I walked my first Camino, I had rain pretty much all day and at some point light snow.
Walk! Make sure your feet are used to the shoes before you start your Camino. Try to do the following (of course depending on your level of fitness):
- Wear your shoes doing daily stuff as often as you can
- Start with walking 5 km a day, at least 4 times a week (with your bag pack whenever possible).
- When you feel everything is going well, switch to 10 km.
- Two weeks before you start the Camino, walk 20-25 km three days in a row once a week. Remember that 25 km a day without resting days is very different that 25 km once a week because your feet can recover. This is not a luxury you have when walking the Camino!
- Walk at least one time in the rain for at least several hours as early in your training schedule as you can. This way you will know how your gear works in wet conditions. Your raincoat and shoes might seem to be waterproof when you walk to the shop and back but it is a totally different ballgame when you walk for hours.
Find the time to train:
Sometimes it is hard to find the time and discipline to train. My two favorite ways to walk a lot were:
- During my preparation I was working in Utrecht and commuting from my house in the centre of Amsterdam by train. I decided to bring my hiking boots to work and get off the train at Amstel Station (5 km), Duivendrecht (8,3 km) or Bijlmer-Arena (10 km) and walk home.
- For my longer walks with gear, I opted to take the train to Zandvoort as early as possible on Saturday or Sunday morning and walk back home (26 km). There are a few small hills and sand so it is quite good preparation.
- You could walk a day of the “gelukkigerwijspad” I particularly like the Rhenen-Doorn path. A bit hilly almost all through nature.
One of the most essential things: How to tie your shoelaces:
For me, it was an experiment which worked out well. I advised some people who were suffering from blisters to do what I do and I had the pleasure of meeting some of them again later on and they actually told me it solved their blister problems.
The problem is that your laces should hold your heel tight in the boot. If you tie your laces very tight, they are okay to keep the heel down but probably too tight for your lower part of your foot. Laces also slip while walking to at first, you might be okay but later the tight laces for the angle lose up a bit and the area around the toes tighten.
First of all I changed my laces to much thinner laces than the original laces so I can double lace them. I also chose a bright color so it is easier to find your shoes amongst many shoes in the albergues. The laces in the examples are RED, last year I used bright blue (nobody uses that color). The main objective of tying your shoes is to prevent your feet to move inside the shoes without restricting blood flow to your feet. I did that by using a double lacing the lowest hooks near my ankles.
Step 1: Tie the laces not too tight on the first hooks around your toes and lower part:

Step 2: Tie the laces quite tight on the hooks near the ankles

Step 3: Tie the laces through the same hooks but now from the back to the front. This will prevent them from slipping. The laces will stay loosely tied at the front of the shoe as well as at the top yet tightly around the ankle hooks.

Step 4: Tie the laces loosely around the rest of the hooks:
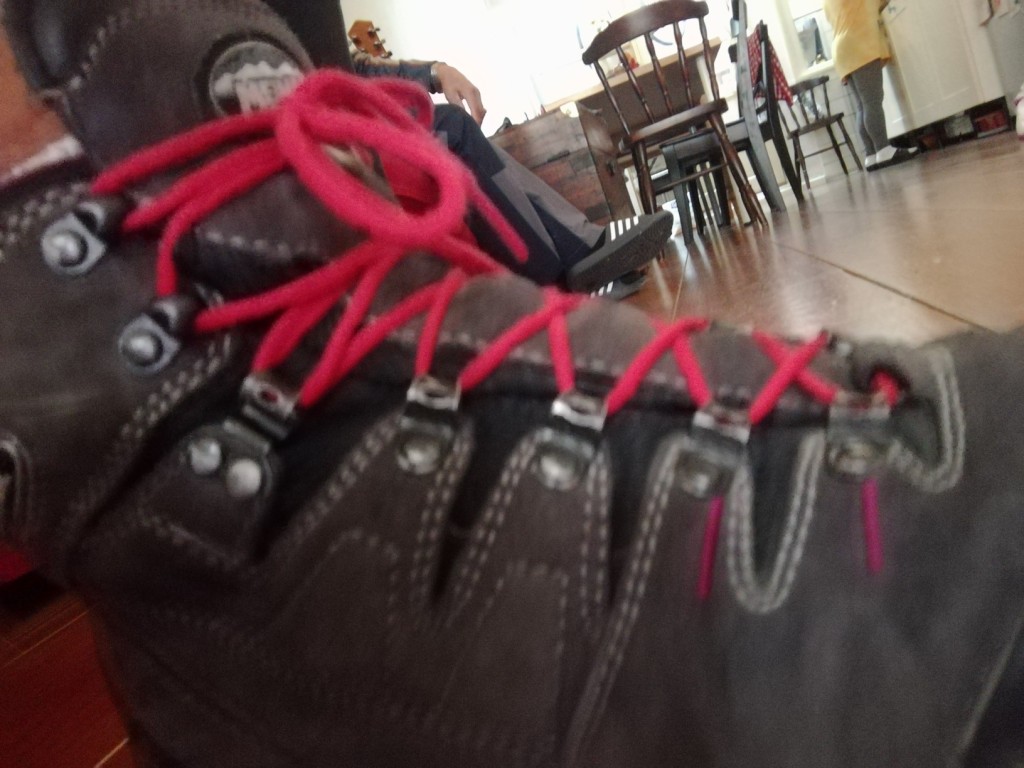
The end result: Try it and see if this works for you.
Lock laces, an alternative:
An alternative which I used in 2020 is to use lock-laces to tighten up the hooks nearest to your ankle. This actually works even better than the double-lace trick described above. Please note that you need to skip the ankle hooks with your normal laces (you need shorter one’s) and then tie the lock-laces quite tight but only on the hooks close to the ankles. Please be aware that if you have hooks from fabric instead metal, you might break the fabric (that is why I would never buy shoes with fabric hooks).
Step 1: Leave the ankle hook free
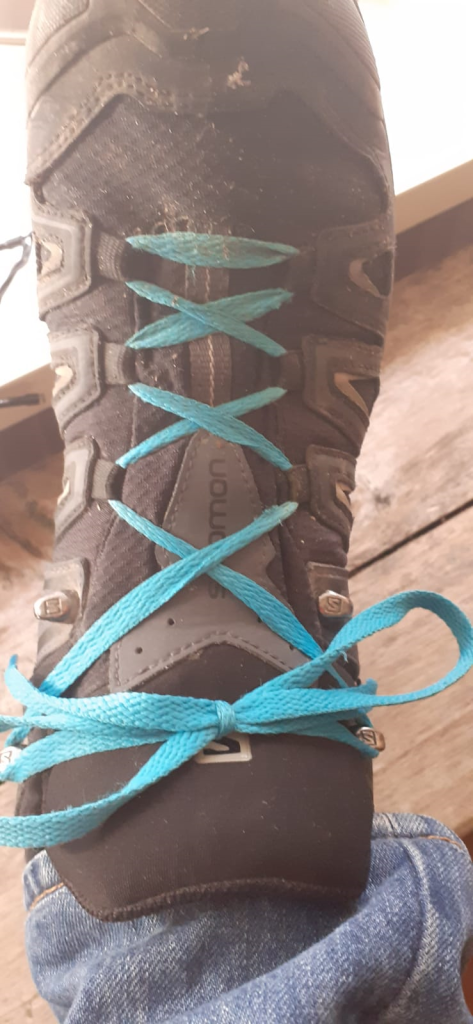
Step 2: Put the lock laces around the ankle hooks
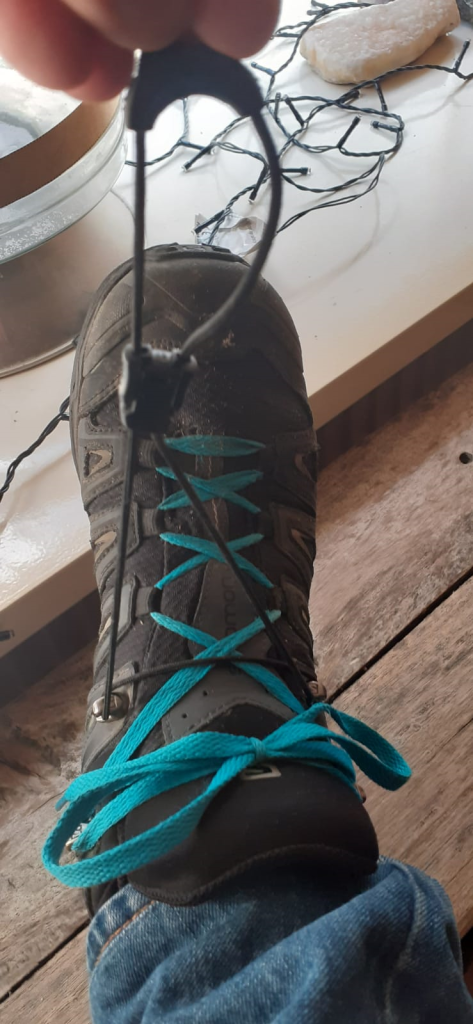
Step 3: Tighten the lock laces
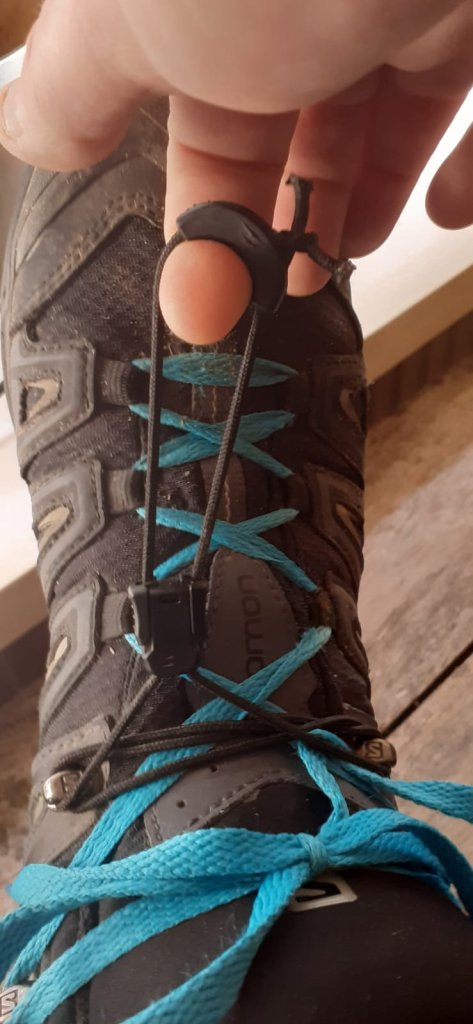
The end result:
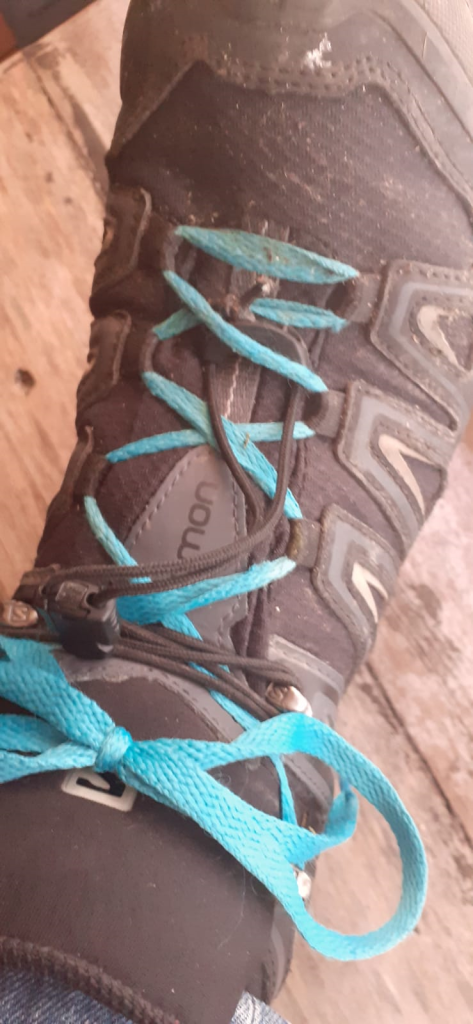
Lock laces can be bought in stores for running equipment and they even sell them in Decathlon:-)
One more tip on lacing your shoes:
Make sure the that either the loop of your shoelace is either small or tied to the outside of your shoe. Why? If you walk (especially downhill with a bag pack), and one of the loops gets stuck in the hook of the other shoe, you will tumble forwards and there it nothing that you can do to stop it.
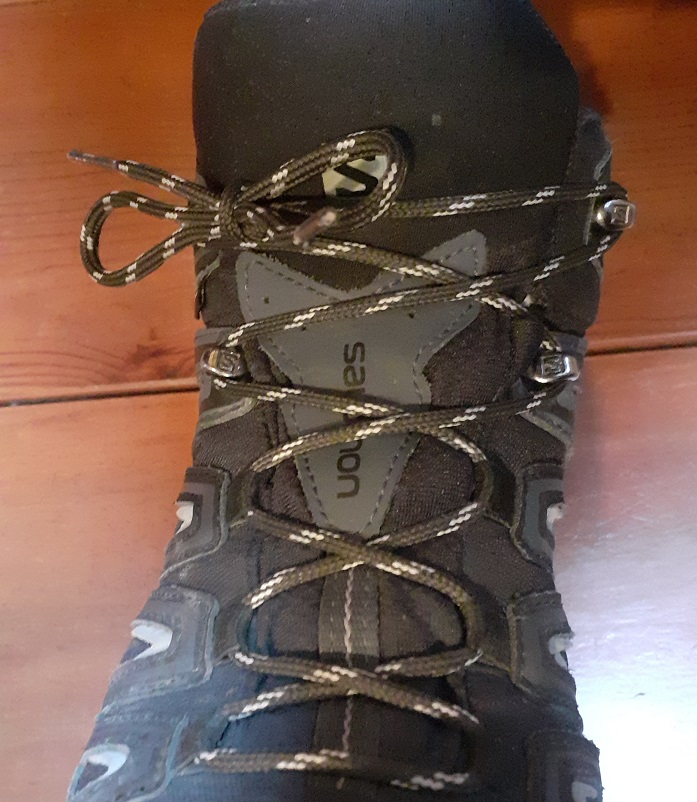
Take care of your feet and shoes while on the Camino:
Don’t walk to fast, especially not in the first week of the Camino. After that you will know better how your body (and feet) react to the walking. And besides, you have pretty much all day and apart from washing, cooking and socializing there is not much more you can do (except of course if you are in bigger places like Pamplona and Leon).
- Whenever you rest, take of your shoes and socks. Try to dry your feet, socks and shoes in the sun (if there is any sun), even if they do not seem to be moist or wet.
- Whenever you can during a rest, put up your feet so they are above your heart. This will allow your body to drain any toxic from your feet. One of my favorite positions is laying down on a bench with my feet on my bag pack.
- Remove excess calluses (eelt) from your feet once every few days (best way at the end of your shower).
- Every day, after shower, put on some calendula cream on your feet.
